.jpg)
Combining a soft palette with a beautifully boho tie-dye twist, this petal garland will bring a soft and romantic look to a spring or summer wedding. "Annie Sloan chalk paint is non-toxic and a little bit goes a long way, so this is a fab project to make on a larger scale with bridesmaids big and small," explains Georgie.
.jpg)
What you'll need:
50cm x 50cm piece of plain cotton
150cm length of cotton bunting tape
Annie Sloan chalk paint (we used Henrietta and Emperor's Silk)
Tin can
Paintbrushes
Teaspoon
Scissors
Tailor's chalk or similar
Pins
Sewing machine
Needle and thread
Makes:
1 x 150cm length
How to make:
Step 1. Cut out the three petal templates, which are available to download from
here
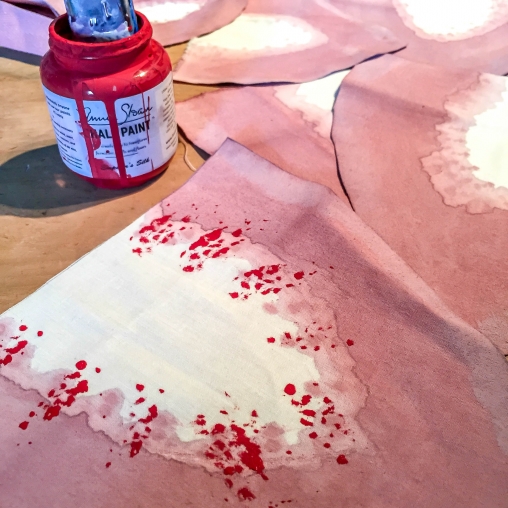
Place them onto your 50cm x 50cm piece of cotton fabric and trace round them with tailor's chalk or similar. You will need five large, two medium size and two small petals.Step 2. Using your tin can, prepare your watery paint by adding two teaspoons of Henrietta to 1/3 of a pint of water. Give it a good stir.
Step 3. Using a small paintbrush, paint around the edges of each petal, letting the watery paint bleed slowly towards the middle. Once you have completed the first one you will get a feel for it. Paint all your petals and leave to dry for approximately three hours.
Step 4. Soak your bunting tape in the tin can with the last of the watery paint. It only needs a few minutes to absorb the color. Squeeze out the excess liquid and leave to dry.
Step 5. When your petals are completely dry, dip a fresh paintbrush into the Emperor's Silk pot of paint and lightly dab little specs around the edge of the white middle. Leave to dry for ten minutes.
Step 6. To create the petal effect, simply work your way around the curved edges of each petal with your fingers and stretch lightly.
Step 7. Make a small pleat in the centre of each petal and fix with a pin. If you are sewing the petals onto their bunting tape with a sewing machine, it's best to add a couple of stitches by hand first to keep the pleat in place.
_step7.jpg)
_step7.jpg)
Step 8. Arrange your petals in order so that the five large petals are in the middle with the medium and small size petals at either end to create a tapered effect. Sew them onto the dyed cotton bunting tape leaving a one cm gap between petals.
_step8.jpg)
Top tip: Create a beautiful backdrop for photos by dying net curtains (with a cotton content) at the same time. Layer up and style against a wall with your petal garland for a romantic photo opportunity.
The Big Beautiful Bunting Company (bigbeautifulbunting.com) has teamed up with Sweetpea and Betty (sweetpeabetty.co.uk) to offer DIY workshops. Get in touch to find out more.


